AWS organization を利用して新しいAWS環境をゼロから作成する
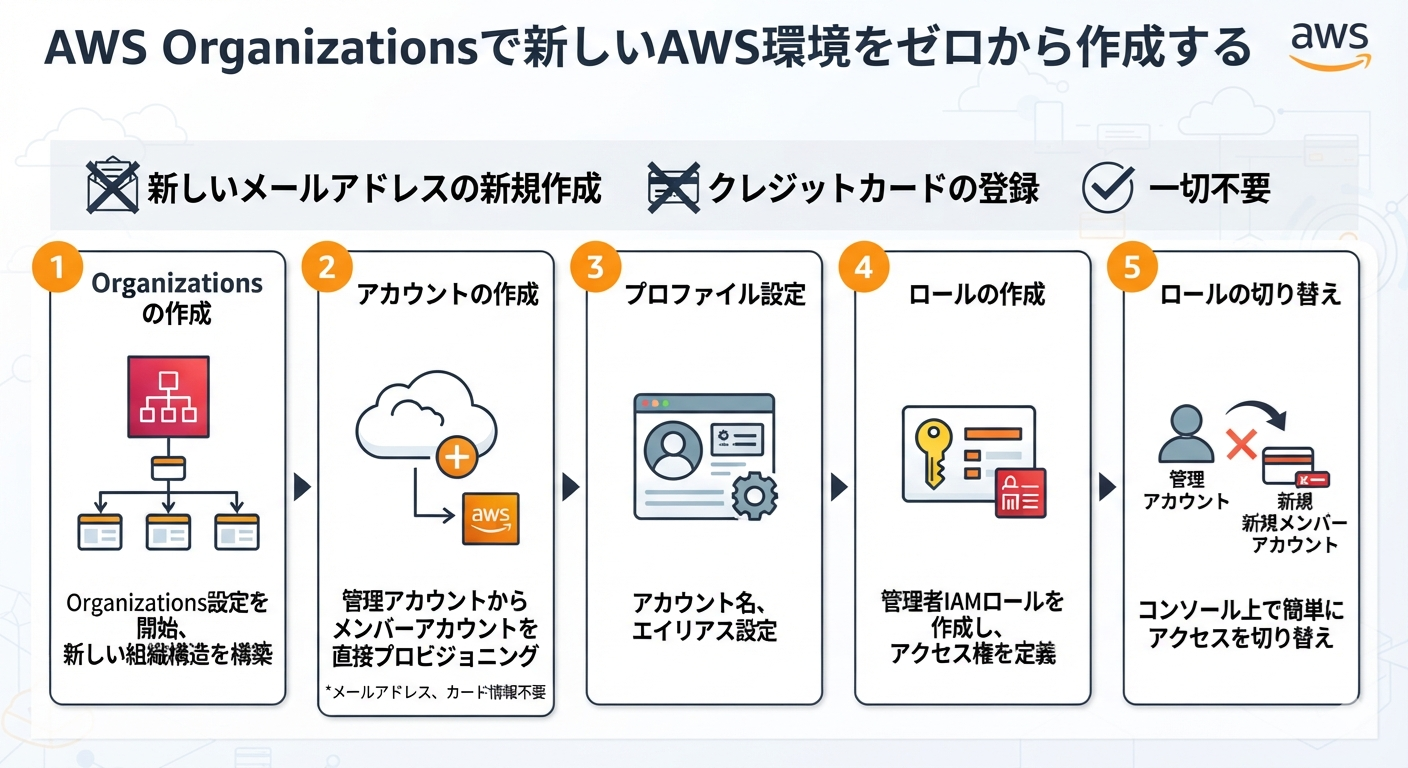
AWSで新しい環境を作りたいけれど、「メールアドレスの新規作成やクレジットカードの登録が面倒だな……」と思ったことはありませんか?今回は、AWS Organizationsを活用して、完全新規のAWS環境をゼロから作成する手順を解説します。※新しいメールアドレスの用意や、カード情報の追加登録は一切不要です。
下記の流れで解説します。
- Organizations の作成
- アカウントの作成
- プロファイル設定
- ロールの作成
- ロールの切り替え
※ 操作はすべてAWS Python ライブラリ(boto3)を使用して実施します。
Organizations の作成
import boto3
from botocore.exceptions import ClientError

client = boto3.client('organizations', region_name='us-east-1')

try:
    response = client.create_organization(
        FeatureSet='ALL'
    )

    org_info = response['Organization']
    print("✅ Organization created successfully.")
    print(f"Management Account ID: {org_info['MasterAccountId']}")

except ClientError as e:
    error_code = e.response['Error']['Code']
    if error_code == 'AlreadyInOrganizationException':
        print("❌ Error: This account is already a member or management account of an organization.")
    elif error_code == 'ConcurrentModificationException':
        print("❌ Error: Concurrent modification detected. Please retry after a few moments.")
    else:
        print(f"❌ Unexpected error occurred: {e}")
プラスメールアドレスについて
AWS organization を利用して新しいAWS環境を作成するにはメールアドレスの登録が必要なのですが、プラスメールアドレスを使えば新しいメールアドレスを都度取得する必要はありません。
プラスメールアドレスGmailやOutlook等は「ユーザー名+任意の文字列@メールドメイン」の形式で、事前設定なしにすぐプラスアドレスを利用できます。届いたメールはすべて元のアドレスの受信トレイに自動集約されます。
アカウントの作成
アカウントを作成します
このアカウントの作成が、新しいAWS環境を作ることに該当します。
ここでメールアドレスを指定する必要があるのですが、上記プラスメールアドレスを使用することで新しいメールアドレスを取得することなく、アカウントを作成できます。
下記例では、自分のメールアドレスがuser01@outleek.comだったとするとプラスメールアドレスでuser01+resources_dev_0808@outleek.comを指定します。
import boto3
import time

EMAIL_ADDRESS = 'user01+resources_dev_0808@outleek.com'
ACCOUNT_NAME = 'resources_dev_0808'

org_client = boto3.client('organizations', region_name='us-east-1')

print("Creating account...")
response = org_client.create_account(
    Email=EMAIL_ADDRESS,
    AccountName=ACCOUNT_NAME
)

request_id = response['CreateAccountStatus']['Id']
account_id = None

for _ in range(10):
    status_response = org_client.describe_create_account_status(
        CreateAccountRequestId=request_id
    )
    status = status_response['CreateAccountStatus']['State']

    print(f"Current status: {status}")

    if status == 'SUCCEEDED':
        account_id = status_response['CreateAccountStatus']['AccountId']
        print(f"Success! Account ID: {account_id}")
        break
    elif status == 'FAILED':
        reason = status_response['CreateAccountStatus']['FailureReason']
        print(f"Failed. Reason: {reason}")
        break

    time.sleep(10)
else:
    print("Timeout waiting for account creation.")
プロフィルの設定
CLIで切り替えられるように%USERPROFILE%/.aws/configにprofile設定を追加します。
YOUR_ACCOUNT_IDはアカウントIDを指定してください。
%USERPROFILE%/.aws/config
[default]
region = ap-northeast-1
output = json

[profile resources_dev_admin]
role_arn = arn:aws:iam::YOUR_ACCOUNT_ID:role/OrganizationAccountAccessRole
source_profile = default
プロファイル(ロール)の切り替え
プロファイルを切り替えるにはAWS_DEFAULT_PROFILE環境変数にプロファイル名を指定します。
set AWS_DEFAULT_PROFILE=resources-dev_admin
メインロールの作成
OrganizationAccountAccessRoleは非常に強力な権限なので、メインで利用するロールは別で作成します。
AWS_ROOT_ACCOUNT_IDは親組織のアカウントIDを指定します。
このロールへは親組織のIAMユーザからのスイッチロールとlambdaへ許可するので、Principalは以下のように指定します。
import json
import boto3

ROLE_NAME = 'ResourcesEnvMainRole'
AWS_PROFILE = "resources_dev_admin"

session1 = boto3.Session()

sts_client = session1.client('sts')
AWS_ROOT_ACCOUNT_ID = sts_client.get_caller_identity()['Account']

session2 = boto3.Session(profile_name=AWS_PROFILE)
client = session2.client('iam')

trust_policy = {
    "Version": "2012-10-17",
    "Statement": [
        {
            "Effect": "Allow",
            "Principal": {
                "AWS": f"arn:aws:iam::{AWS_ROOT_ACCOUNT_ID}:root",
                "Service": [
                    "lambda.amazonaws.com"
                ]
            },
            "Action": "sts:AssumeRole"
        }
    ]
}

response = client.create_role(
    RoleName=ROLE_NAME,
    AssumeRolePolicyDocument=json.dumps(trust_policy),
)

print(response['Role']['Arn'])
プロフィルの設定
CLIで切り替えられるように%USERPROFILE%/.aws/configにprofile設定を追加します。
YOUR_ACCOUNT_IDはアカウントIDを指定してください。
%USERPROFILE%/.aws/config
[default]
region = ap-northeast-1
output = json

[profile resources_dev_admin]
region = ap-northeast-1
role_arn = arn:aws:iam::YOUR_ACCOUNT_ID:role/OrganizationAccountAccessRole
source_profile = default

[profile resources_dev]
region = ap-northeast-1
role_arn = arn:aws:iam::YOUR_ACCOUNT_ID:role/ResourcesEnvMainRole
source_profile = default
プロファイル(ロール)の切り替え
プロファイルを切り替えるにはAWS_DEFAULT_PROFILE環境変数にプロファイル名を指定します。
set AWS_DEFAULT_PROFILE=resources-dev
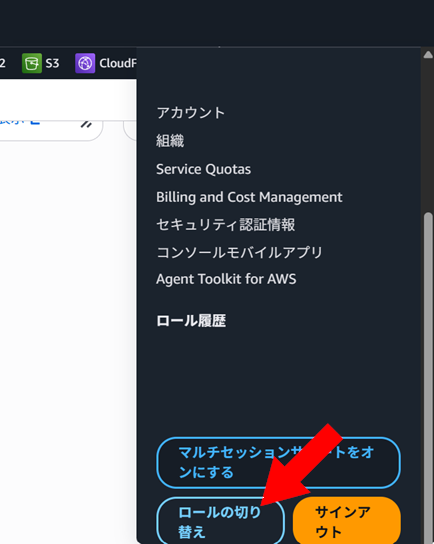
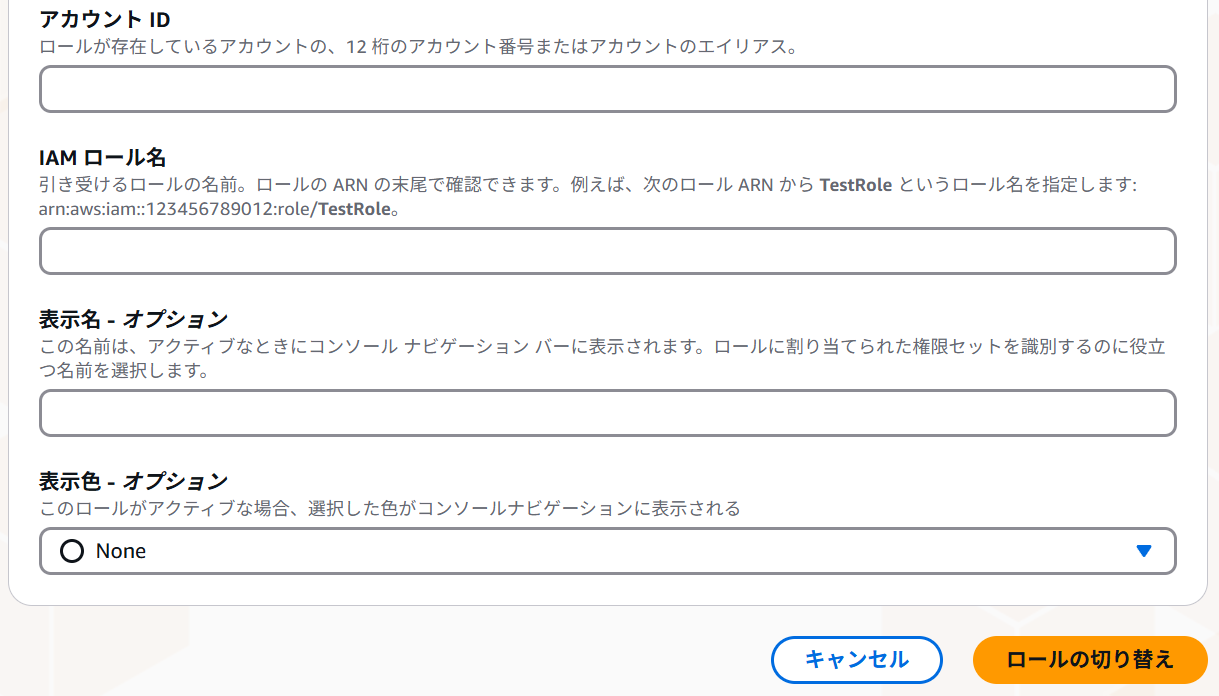
Webコンソールから切り替えもできます。
👇右上のアカウントのところにあるロールの切り替えをクリックして
アカウントID``IAMロール名を入力すれば認証無しで切り替えできます。
ロールの削除(構成が不要になった場合のみ)
import boto3

ROLE_NAME = 'ResourcesEnvMainRole'
AWS_PROFILE = "resources_dev_admin"

session = boto3.Session(profile_name=AWS_PROFILE)
client = session.client('iam')

try:
    inline_policies = client.list_role_policies(RoleName=ROLE_NAME)['PolicyNames']
    for policy_name in inline_policies:
        client.delete_role_policy(RoleName=ROLE_NAME, PolicyName=policy_name)
except client.exceptions.NoSuchEntityException:
    pass

try:
    attached_policies = client.list_attached_role_policies(RoleName=ROLE_NAME)['AttachedPolicies']
    for policy in attached_policies:
        client.detach_role_policy(RoleName=ROLE_NAME, PolicyArn=policy['PolicyArn'])
except client.exceptions.NoSuchEntityException:
    pass

try:
    client.delete_role(RoleName=ROLE_NAME)
    print(f"Deleted role: {ROLE_NAME}")
except client.exceptions.NoSuchEntityException:
    print(f"Role {ROLE_NAME} does not exist.")
アカウントの閉鎖(構成が不要になった場合のみ)
検証が終わったらアカウントを閉鎖します。 アカウントを閉鎖すれば、90日後に全リソースがすべてきれいに削除されるので便利です。
import boto3
from botocore.exceptions import ClientError

# Specify the 12-digit AWS Account ID to close
TARGET_ACCOUNT_ID = '123456789012'

# Initialize the Organizations client (requires Management Account credentials)
client = boto3.client('organizations')

# Execute account closure
try:
    response = client.close_account(
        AccountId=TARGET_ACCOUNT_ID
    )
    print(f"Successfully requested closure for account {TARGET_ACCOUNT_ID}.")
    print(response)
except ClientError as e:
    print(f"An error occurred: {e}")
関連記事
- AWS organization を利用して新しいAWS環境をゼロから作成する
- AWS lambda関数の作成から実行まで
- AWS lambda関数と SQS SNS との連携
- AWS APIGateway からの SNS 連携
- AWS APIGateway からの lambda 連携
- AWS Lambda のソースを更新する
- AWS Lambda でLine bot を作成する
- AWS Lambda で Telegram bot を作成する
- AWS Lambda のソースを更新する
- AWS S3の作成からファイルの登録公開まで
AWS organization を利用して新しいAWS環境をゼロから作成する
更新日:2026年08月15日

